今天抽时间将所有的网站SSL证书都更新了成 Let’s Encrypt 了。采用了certbot 这样的自动化工具,配置管理起来非常容易(一本正经的胡说八道),这里将对整个体验过程做个详细记录。
了解 Let’s Encrypt
The project aims to make encrypted connections in the World Wide Web the default case. By getting rid of payment, web server configuration, validation emails and dealing with expired certificates it is meant to significantly lower the complexity of setting up and maintaining TLS encryption.On a Linux web server, execution of only two commands is sufficient to set up HTTPS encryption, acquire and install certificates within 20 to 30 seconds.
Let’s Encrypt 是一个2015年末推出的数字证书认证机构,将通过旨在消除当前手动创建和安装证书的复杂过程的自动化流程,为安全网站提供免费的SSL/TLS证书。
获取 Let’s Encrypt
Let’s Encrypt 证书生成不需要手动进行,官方推荐 Certbot 这套自动化工具来实现。4步轻松搞定:
- 下载安装 certbot (Let’s Encrypt项目的自动化工具)
- 获得SSL证书
- 修改Nginx配置文件
- 续订
1. 安装 Certbot
根据 Certbot 官网指南,Debian 8上执行如下命令,安装certbot:
1 | $ sudo apt-get update |
等安装完成,certbot就可以使用了。
2. 获取SSL证书
Let’s Encrypt提供了通过各种插件获取SSL证书的各种方法。不同的是Apache的插件,大多数的插件只会帮助你得到,你必须手动配置你的Web服务器使用证书。仅获取证书而不安装证书的插件称为“验证器”,因为它们用于验证服务器是否应颁发证书。
下面将使用Webroot的插件来获取SSL证书。
如何使用 Webroot 插件:
Webroot 的工作插件放置在一个特殊的文件/.well-known目录文档根目录下,它可以打开(通过Web服务器)内由让我们的加密服务进行验证。 根据配置的不同,你可能需要明确允许访问/.well-known目录。
为了确保该目录可供Let’s Encrypt进行验证,让我们快速更改我们的Nginx配置。编辑/etc/nginx/conf.d/example.com.conf文件,并将下面代码添加进去:
1 | location ~ /.well-known { |
使用nginx -t测试配置文件是否正确,在正确的情况下,重新让Nginx重新加载配置文件:
1 | $ sudo systemctl reload nginx |
使用certbot命令获取证书:
1 | $ sudo certbot certonly --webroot -w /var/www/example -d example.com -d www.example.com -w /var/www/thing -d thing.is -d m.thing.is |
-w:指定网站所在目录-d:指定要生成证书的域名,如果你想多个域名保存在一个证书里(最多四个)(如example.com、www.example.com、thing.is、m.thing.is),请确保使用适当的webroot路径和域名替换命令中的相对应部分。
接下来,同意加密订阅协议: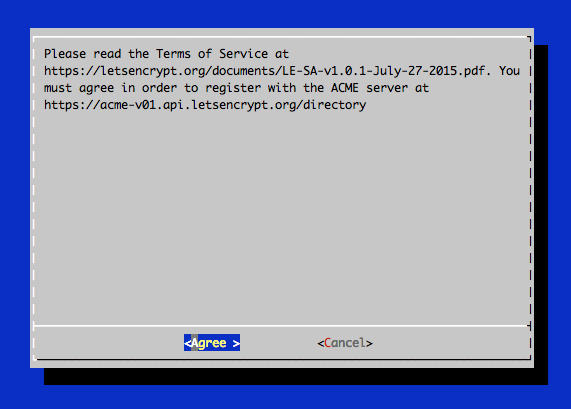
如果一切顺利,你应该看到一个类似下面的输出消息:
IMPORTANT NOTES:
- Congratulations! Your certificate and chain have been saved at
/etc/letsencrypt/live/example.com/fullchain.pem. Your cert will expire
on2017-06-19. To obtain a new or tweaked version of this
certificate in the future, simply run certbot again. To
non-interactively renew all of your certificates, run “certbot
renew” - If you like Certbot, please consider supporting our work by:Donating to ISRG / Let’s Encrypt: https://letsencrypt.org/donate
Donating to EFF: https://eff.org/donate-le
证书文件
如果运行顺利,所有服务器所需要的证书就已经生成好了。他们被放在了 /etc/letsencrypt/live/example.com/ 下:
1 | $ ls /etc/letsencrypt/live/example.com/ |
3.修改Nginx配置文件
到这里已经成功一大半了,只需要配置 Nginx 支持刚刚生成的证书。最佳实践可以参考Mozilla SSL Configuration Generator。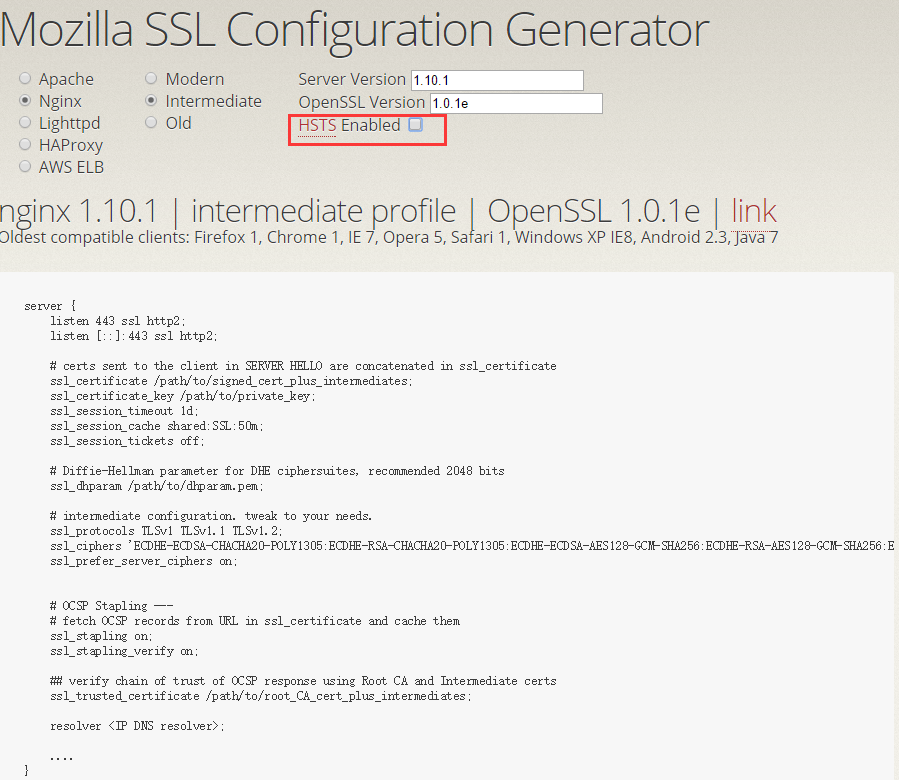
注意去掉HSTS的勾(勾上会强制https,并且很难消除后续影响)。
请根据自己的服务配置修改和添加内容,重点只需要关注6行:
1 | server { |
dhparam.pem可以通过以下命令生成:
1 | $ sudo mkdir /etc/nginx/ssl |
Nginx 配置完成后重启,用浏览器测试是否一切正常。
4.续订
Let's Encrypt证书有效期只有3个月,所以,需要定时renew。我将使用corntab来执行renew命令:
1 | $ sudo crontab -e |
添加以下行:
1 | 30 2 * * 1 /usr/bin/certbot renew >> /var/log/le-renew.log && /bin/systemctl reload nginx |
保存,并退出。这个定时任务将在每个星期一的凌晨两点半执行certbot renew命令,并重启Nginx。最后将日志输出到/var/log/le-renewal.log。
测试你的网站 SSL 安全性
Qualys SSL Labs 提供了全面的 SSL 安全性测试,填写你的网站域名,给自己的 HTTPS 配置打个分。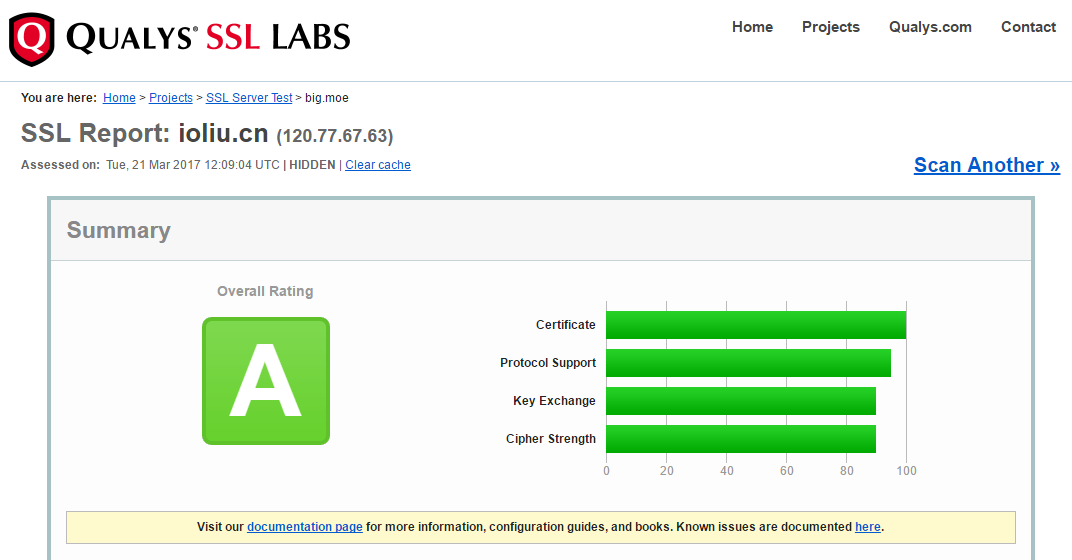
这意味着你网站的HTTPS已经启用成功啦,为自己鼓个掌。 (๑•̀ㅂ•́)و✧。
附:
还有一种方法,不需要访问你的网站目录,但需要临时停止Nginx服务器(需要用到80端口):
- 停止Nginx
- 域名解析到你的服务器IP
- 执行命令:
certbot certonly --standalone -d example.com -d www.example.com
然后的步骤就和上面一样啦~~~
以上。

